Saturday, June 9, 2012

Cricut Cake Heart Tutorial

Hi, Everone! How's everyones' weekend going? Mine started off with getting off of work Friday night and running home to start on a cupcake order I had for early this morning. I wanted to do a quick tutorial on how I made the toppers for these cupcakes, so I knew that it was going to take a little longer than normal to get these cupcakes done. First, let me start off by saying that if you love to cake decorate and bake some fun cakes, then you must DEFINITELY consider buying the Cricut Cake Machine. I absolutely love mine. Mine is the Martha Stewart Edition (duhhhh! I  ♥ Marth Stewart)! It takes a couple of tries to finally get the hang of it, but if you have used the Cricut expression or any other Cricut Machine then you are mort than likely not going to have any problem with this whatsoever.


Here is what you need for 32 hearts. The gumpaste goes under the cup so that it doesn't harden. If you have worked with gumpaste before you will know that it hardens very quick. The shortening you need to rub up and down in a thin layer on the Cricut mat.

I used the Cricut Love Struck 2010 Seasonal Cartridge.


Knead the gumpaste together with the coloring of your choice. Spread the shortening on your mat and then roll the gumpaste out to a very thin layer.

This is the shape I chose and the perfect size I have found for a cupcake topper with this heart is 1 3/4".
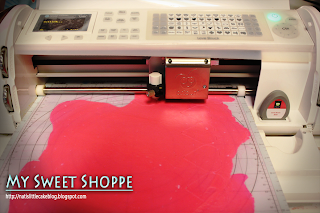
Load your mat with the gumpaste and position the blade where you want it to start and start cutting.

Once you are done cutting, remove the leftover gumpaste and slowly remove the hearts from the mat so that they don't stretch and get deformed. If you need to cut more hearts repeat the process by respreading shortening on your mat and rekneading your gumpaste and rolling it out. If your gumpaste is getting a little hard, add a pinch of shortening onto it while you are kneading it and it will soften again.
Place the cut out hearts on a plastic non sticky surface and let them air dry for about 4 hours and then flip each one of them onto the opposite side and let them air dry for at least another 6 hours.

So, with all that said and done I make the cupcakes. White cake with raspberry filling in them. The white icing was homemade and I decided to add some cute sugar crystals since these cupcakes are for a bridal shower.


And then once the hearts have harden completely, all you do is stick the hearts into the cupcakes and "TA, DA" they are done!


Thanks for stoppin by! I hope this little tutorial made you want to play with your Cricut Cake more, or helps you decide if it's for you or not, or maybe it just helped you realize you are now craving a cupcake! Lol! Hope to see you soon!

Happy Baking!


No comments: